May 14, 2026
6 min
What is the reach zone in ergonomics?

Leaving empty-handed? Find the best deals to create your dream workspace!
Shop all$0


30-DAY RETURNS


Do you wrap up your workday with a tight neck and sore shoulders, but have no clue why? You might blame it on long hours at your desk, but the way you set up your mouse, keyboard, and other items could hurt you more than you realize. That's where reach zones can help.
In ergonomics, reach zones show the areas around your desk where you can easily reach what you need. Imagine your workspace in 4 horizontal and 3 vertical sections, each keeping things comfortably close.
Reach zones are based on DSE (Display Screen Equipment) guidelines that protect people who spend a lot of time in front of screens. The idea is that the farther you reach from where you usually sit, the more stress you put on your muscles and joints. A badly arranged desk often causes neck and shoulder pain by the end of the day and can drain your focus, energy, and productivity.
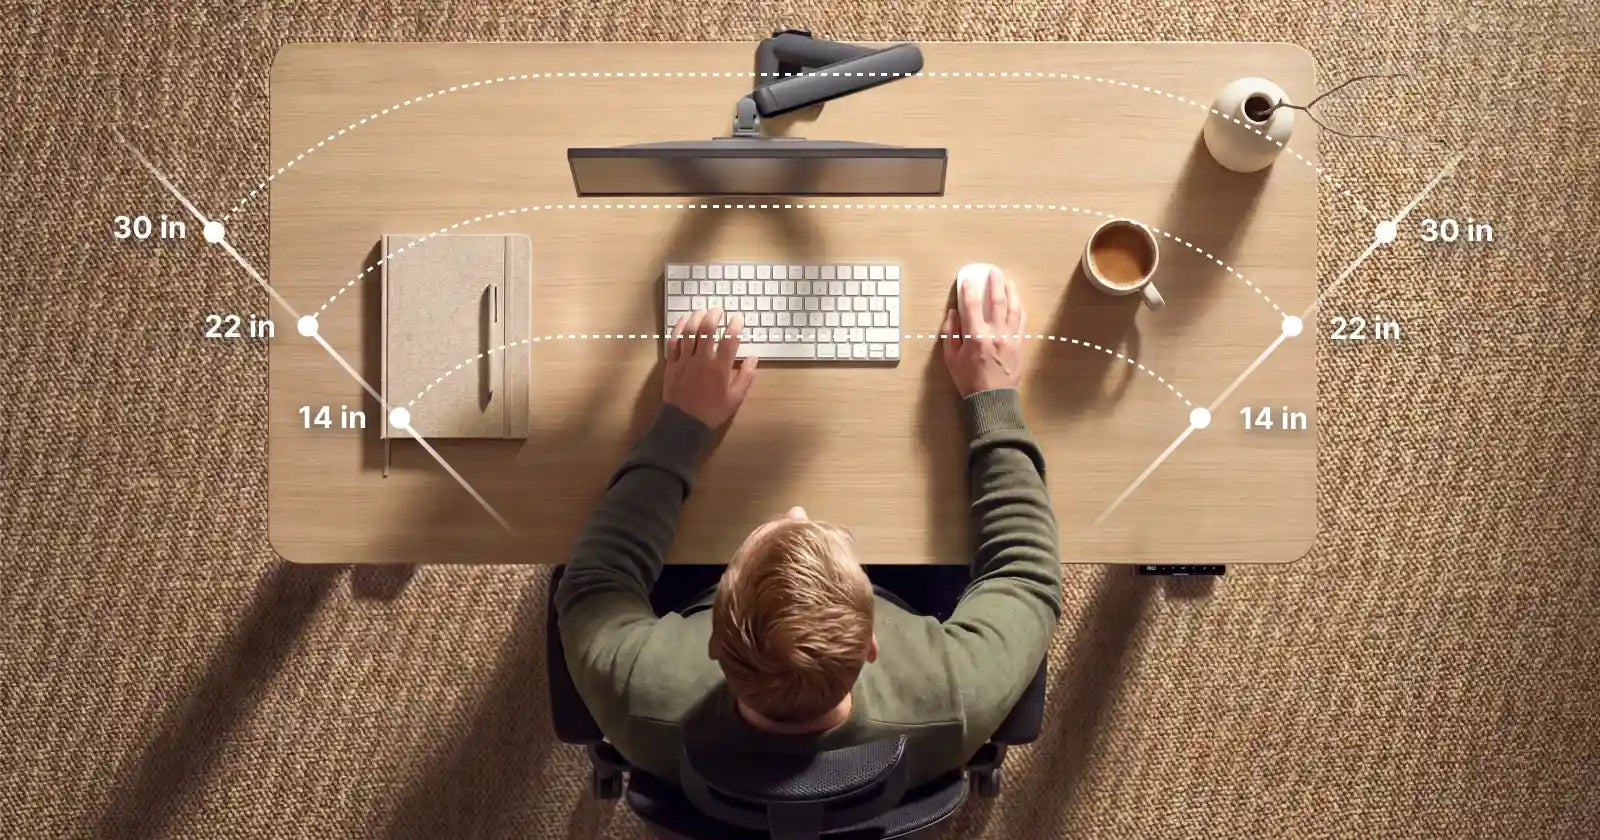
To picture horizontal reach zones, think of rings spreading out from your body. Each ring changes how easy it feels to grab an item.
The first zone is right in front of you, where you can reach everything with just your forearm while your upper arms stay relaxed at your sides and your wrists stay straight.
Your keyboard, mouse, and water bottle all deserve a spot in Zone 1. Remember to take a sip now and then!
When you reach this area, your arm stretches a bit more than usual. It’s a good place for things you use sometimes, like sticky notes or a second screen.
Stretch your arms fully, and you’ll reach Zone 3. Here, keep only what you need a few times a day, like a charging cable or desk lamp. If you find yourself reaching here more often, move that item closer.
Zone 4 is the farthest you can reach. If you often have to stretch this far, it means you should rearrange your desk. The one exception is your phone, if you don’t need it for work. Keep it in Zone 4 to avoid distractions.
| HORIZONTAL ZONE | NAME | DISTANCE from user |
|---|---|---|
| 1 | primary zone | up to 14" |
| 2 | secondary zone | up to 22" |
| 3 | extended reach | up to 30" |
| 4 | maximum reach | 30" and beyond |
Think of horizontal ergonomic reach zones as a useful guide, not a strict set of rules. Begin with these suggested distances, then change them until your workspace feels right. Some tips from the Health and Safety Executive (2013) include keeping your mouse nearby, holding your wrist straight, and avoiding uncomfortable or repeated movements.
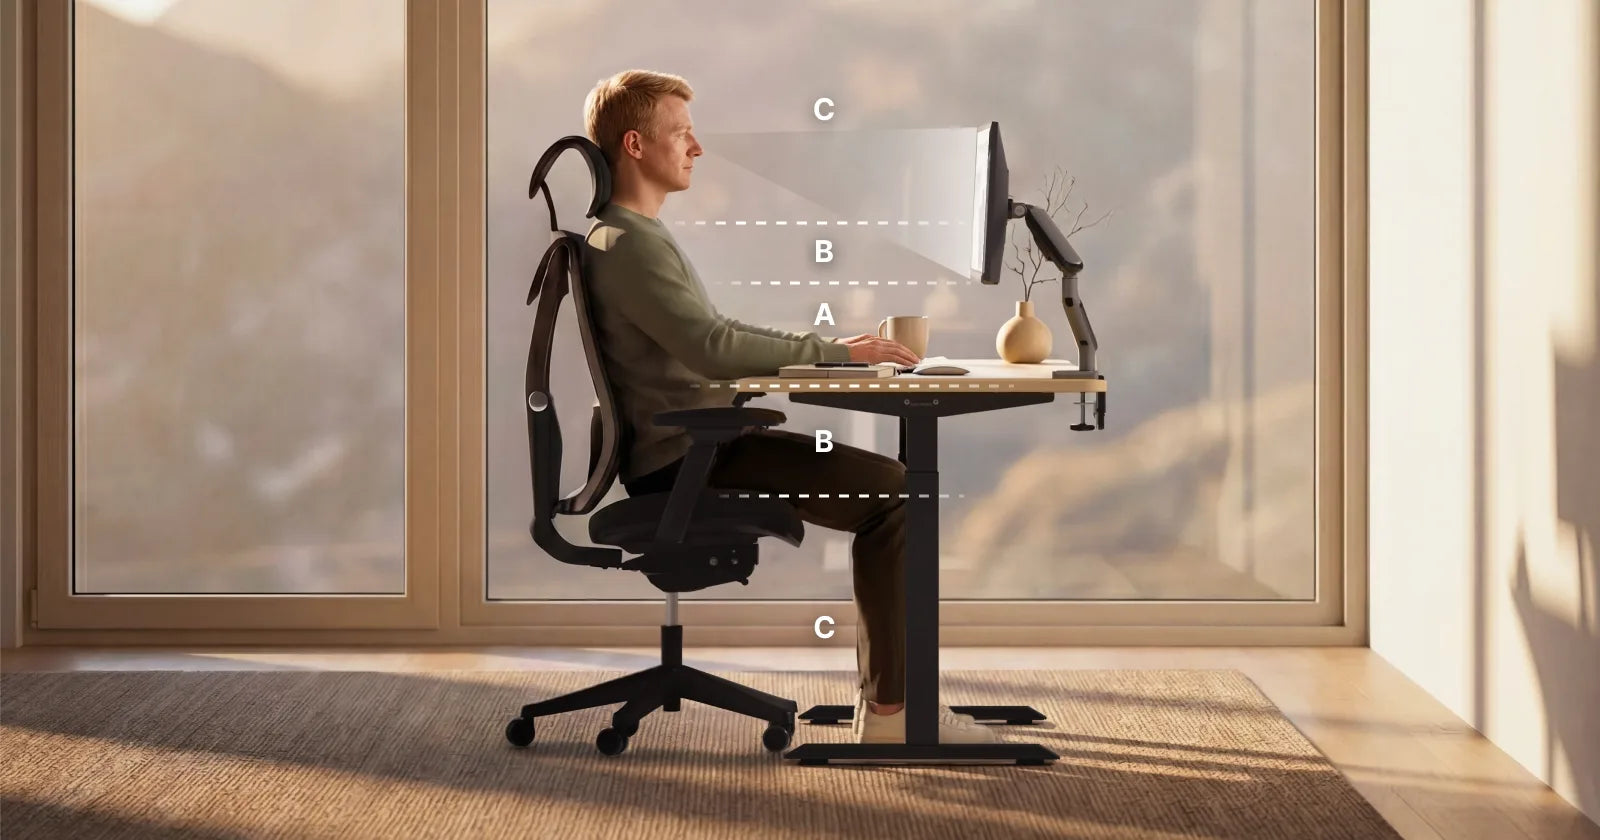
Vertical reach zones work the same way, but picture layers going above and below your elbows. Each layer shows how hard your body has to work to reach things at different heights.
Here you rest your forearms comfortably, parallel to the tabletop, and keep your eyes level with the top edge of your screen.
Zone B includes the space just above your desk up to your shoulders, or down to mid-thigh. A shelf above your monitor or a drawer you use sometimes are good examples. These spots are fine for things you only need occasionally, but not for items you use every day.
Zone C is everything above your shoulders or below your knees. For example, a high shelf you have to stretch for. Since these spots require reaching or bending, use them only for things you rarely need.
| VERTICAL ZONE | NAME | DISTANCE |
|---|---|---|
| A | primary zone | elbow height |
| B | secondary zone | shoulder to mid-thigh |
| C | maximum zone | beyond zone B |
Vertical ergonomic reach zones are general guidelines created for most people. Use these measurements as a starting point but change them to match what feels best for you.
When you understand your reach zones, you can spot setup problems early and fix them before they become bigger issues.
The height of your seat impacts your entire workspace. If it doesn’t feel right, the rest of your setup will be off. Choose an ergonomic desk chair that feels comfortable and gives your body good support.
Once your chair is set up, you have a good starting point. Adjust your desk height next so your workspace fits into Zone A. If you’re not sure which Desktronic chair is right for you, read more about ergonomic chairs to find one that really supports you.
A monitor arm helps you put your screen exactly where you need it in Zone A. It also saves desk space!
A desk that moves up and down keeps you comfortable in Zone A, whether you’re sitting or standing. If you’re considering your options, starting with a rising desk is a smart move. The benefits of a standing desk can improve your workflow and workday.

Everything you need for comfortable work

Built to exceed every standard